FTP Access
We're happy to start working on a project with you. We will need FTP access to your website (what is FTP access?) in order to grab files, post new files or do whatever else is necessary. Here is what we need:
- FTP host name
- FTP username
- FTP password
- webroot path (optional - we can usually figure this out)
Web Hosting Control Panel
Sometimes, instead of FTP access, we'll get the control panel login. This works fine in most cases. We'll most likely need to create a FTP user that we can use. It's sometimes called cPanel or Plesk or something else.
You can securely submit your FTP/Control Panel information here.
Database Creation
In some cases, we'll need to create a database for your website. We can usually accomplish this by getting to the web hosting control panel login information.
Website CMS/Administrator Login
If your website is using a system where there's a back-end login to make changes to the website, then we most likely will also need your administrator login for that area (a username and password). Common systems are Dot Net Nuke, Joomla, Magento, Drupal or WordPress.
What if I Don't Know This Information?
You should contact your website host (this is sometimes the same company as your ISP (Internet Service Provider) but not always) and they should provide you with either the FTP information or else a web hosting control panel. If we try to call on your behalf, they might not (they shouldn't) give that information to us unless you have given them permission to give it to us.
Great - we're glad to have you as a web hosting client. Here is what we need to start setting things up:
- Contact Information - The name and email account of whom at your organization will be our contact person for website hosting.
- Email Accounts - A list of email accounts with passwords. If you have aliases that you want, please list those with the account that it's an alias of (sometimes aliases are called "forwards" so one email address does not collect email but just forwards to another account on the same domain name - versus a true "forward" which redirects email to another domain name).
- DNS Server Change - We'll soon need to change the DNS servers on your domain, so we'll need to login to your domain name registrar (such as Network Solutions or GoDaddy.com or wherever you purchased your domain name). If we're not moving email, then your DNS may need to stay where it's at. In that case, we can tell you what your DNS host needs to change.
Optionally, we can tell you what DNS changes need to be made and you can do them yourself - the only problem with DNS is if there's a mistake, you sometimes have to wait 8-24 hours or more for the changes to take effect. If you don't know what you're doing, then we suggest that we make the changes for you and you can change your password when we're done if you want.
- SSL Certificate - If you have an existing SSL certificate that will be transferred over, then we need the private key and public key. There might also be an intermediate certificate (depending on where you got the SSL certificate) and we will need that as well.
Additional tips and information for website hosting:
- When registering a domain name, use an account alias like "info@yourdomain.com" so that it's an email account that you will always have control of. Do not use an email account at your ISP since that can change with your hosting and you might not be notified when your domain expires.
- It's best to switch a domain / website and email at the same time. When email switches, what you will do is come in the next morning (since we do it at night), check the old account. This clears all email from the old email server. You will then change the settings in your email program to our servers to start receiving email.
- In preparation for a DNS change, your host should set the TTL (time to live) on the record down to 1 hour. After the site launches, it should be put back to where it was, which is typically 24 hours.
UPS Shopping Cart Integration
To have your website shopping cart connected with UPS shipping, we need the following:
1. Sign Up at UPS
First, go to the UPS Developer Kit page. The steps at UPS (at the time of this article) are:
Step 1: Register with My UPS.
Step 2: Log-in
Step 3: Select an API.
Step 4: Download the API documentation.
Step 5: Request an access key.
(See the walkthrough below if you need help)
Once you are done there, please send us your:
- Username
- Password
- UPS Access Code
Here's a walkthrough of what to do at UPS:
Basically, you need to get an access key but to do that, UPS wants to make sure you have a shipping account with them.
- Steps 1 and 2 should be self-explanatory.
- Step 3 is where you select an API. When you login, it's not obvious where to do this. Basically, you can skip steps 3 and 4. Go to step 5.
- Step 5 is requesting the access key. Click on that link and go to the form. They will want you to add or open a UPS account.
- If you need to set up a UPS account, then they are going to walk you through a wizard (series of questions) to set that up.
- If you have an account with UPS, then they will ask you for the account number, name and postal code.
- If needed, go back to Step 5 and request the key again but by setting up an account or linking an accout should get the process rolling.
2. Tell Us Which Options You Want
Tell us which types of UPS pickup methods you want:
- Daily Pickup
- Customer Counter
- One Time Pickup
- On Call Air Pickup
- Letter Center
- Air Service Center
Tell us which types of UPS packaging you are using:
- UPS Letter
- Package
- UPS Tube
- UPS Pak
- UPS Express Box
- UPS 25 kg Box
- UPS 10 kg Box
Tell us which shipping methods you want displayed on your website:
- UPS Next Day Air
- UPS 2nd Day Air
- UPS Ground
- UPS Worldwide Express
- UPS Worldwide Expedited
- UPS Standard
- UPS 3 Day Select
- UPS Next Day Air Saver
- UPS Next Day Air Early A.M.
- UPS Worldwide Express Plus
- UPS 2nd Day Air A.M
- UPS Express Saver
Send us all this information we're requesting here either through Basecamp or else via your open ticket in our ticket system.
Take Credit Cards Online
Being able to take credit card payments online can seem a bit confusing. This article will try to explain thing a bit.
1. Start with your bank.
Your payment gateway will need to connect with your merchant account, which connects to your checking account. If you don't have a merchant account, you'll first need that. Banks provide those usually.
2. Get a payment gateway to connect your website with the banking world.
For a payment gateway, your bank might have their own, kind of "home spun" payment gateway that they will suggest. The problem with many of those is that to interface with that proprietary software, we need to dig into their API (application programmer's interface) and write our own software to communicate with their special gateway. This will take time and we'll have to charge for this. Minimally, we're talking 5 hours or so, which is about $400-$500 or even more.
The better option is just to go with the most popular payment gateway out there - Authorize.net. They're the leader and virtually every kind of website e-commerce / shopping cart software that's out there will interface with it. You can sign up with them either through your bank (maybe), though a reseller or with them directly. The difference is that the set up fees will vary.
3. We'll take it from there!
Once you have done one of the above, get us what we need and we'll take over from there.
File Transfer Protocol (FTP) for Website Access
FTP stands for "File Transfer Protocol" - does that answer your question? Of course not - that's geek speak.
That is what it is though - it's a protocol for transferring files. Files for your website sit on a web server. That server is always on the Internet so that your website is always accessible. For people to view your website, they need to get the files that reside on your web server. So to get the files to the web server (upload) or to grab the files from the web server (download), you need to have a way to connect to it.
That's what FTP is. It's a way to connect to your web server to transfer files.
FTP Programs
You need an FTP program (sometimes called an "FTP client" by the geeks) in order to upload and download files. There are some popular ones out there like WS_FTP (Windows), Transmit (for Mac) or FileZilla (for PCs or Macs). Some are free and some you have to pay a little for. Using your web browser for FTP can work but using an FTP program works much better.
If you use Firefox as your web browser, then there's a handy plugin called FireFTP that works pretty well. You can use it to test your connection.
Information Needed for an FTP Connection
Once you have that, you need to get the FTP connection information from your web host. This consists of:
- FTP server name (and FTP port - otherwise, the default port of 22 is used)
- FTP username
- FTP password
There may also be a:
But we can usually figure out what that is just by looking around.
If we're asking for FTP information from you, the 3 things listed above is what we need. If you are not sure what it is, then the best place to find out is by contacting your web host. Thanks!
Are You Trying to FTP to Webstix?
Sometimes we ask clients to FTP files to our server. This is different than us trying get access to your website. For more information on trying to FTP information TO Webstix, please see the "Sending Large Files" article.
Also See:
Good question. First, let's quickly discuss why you might not want to do this.
With most, if not all, websites we set up, the home page title is carefully crafted with the right keywords to help your website rank high (provided that there are enough links from other website pointing to yours - but this is another topic altogether). The keywords in your home page title tag are important. This helps your website rank well for search terms that it contains. The link people will click on at search engines like Google is your home page title tag.
Changing the home page title tag could cause your website to lose its ranking and you could start getting less traffic to your site. So be careful doing this. Having a title that's too long could have an adverse effect as well. You need to know what you're doing but we do encourage some experimentation. Just be sure you have recorded what the old title was on what day if you do plan on changing it so that you can change it back to what is was before. The CMS does not keep track of previous versions of page titles.
How to Change Your Home Page Title Tag
- Login to the CMS admin.
- Go to: Components > ARTIO JoomSEF
- Click on "View/Edit SEF Urls"
- In the "Filter SEF Urls:" box, enter this (without the quotes): "index.php?option=com_content&view=frontpage" and tab to another field so that it pulls up the results.
- There should be one result showing. Click on the checkbox next to this item and click "Edit" at the top of the page.
- Where it shows "Title:" you can change this page's title.
- Click Save.
The Meta Description and Meta Keywords fields don't necessarily need to be filled in since they don't mean much with search engines anymore (this is especially true with Meta Description).
The Short Answer:
To force refresh a page on your desktop computer,
Do a SHIFT + Reload
Hold down the SHIFT key and click the Reload button in your browser at the same time.
The Long Answer:
When changes are made to a web page, often web developers will have to update the same files on the server. If you've been to that web page in the last day or so, your web browser may be set up to cache (save) images locally on your computer to help speed up browsing. If this occurs, then you may not be seeing the changes that were made to a web page since you do not have the updated files. What you need to do is force your web browser to refresh the page.
This is simple to do and a good, handy tip if you ever run into a problem on a website you visit often.
How to Do a Force Refresh on a Desktop Computer or Laptop
To do a "force refresh" you should hold down the SHIFT key on your keyboard while clicking the Refresh button in your browser (at the same time). This forces your browser to delete anything that's cached and get new versions of all the files from the server, which includes things like images and CSS files.
You will then grab the latest files from the server and things that you thought were not working on your website may now work. Please check this before you contact us about things not working.
How to Do a Force Refresh on an iPad or iPhone
To do this on an iPad or iPhone, you'll need to:
- Go to Settings
- Scroll down to Safari
- Scroll down to "Clear History and Website Data."
You'll be asked if you want to clear everything - so, just be warned... this will clear everything... your browser history (not bookmarks), cache and cookies.
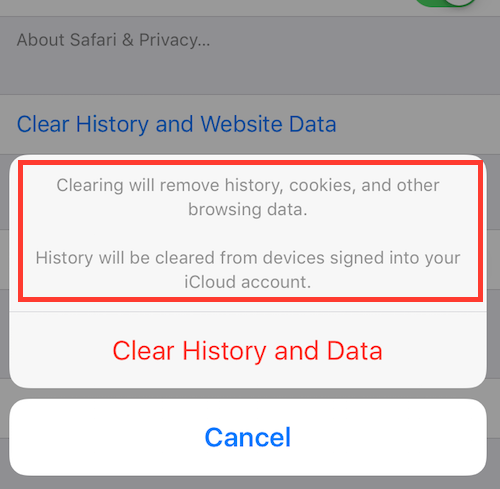
Do that and then return to Safari and reload the page (if necessary).
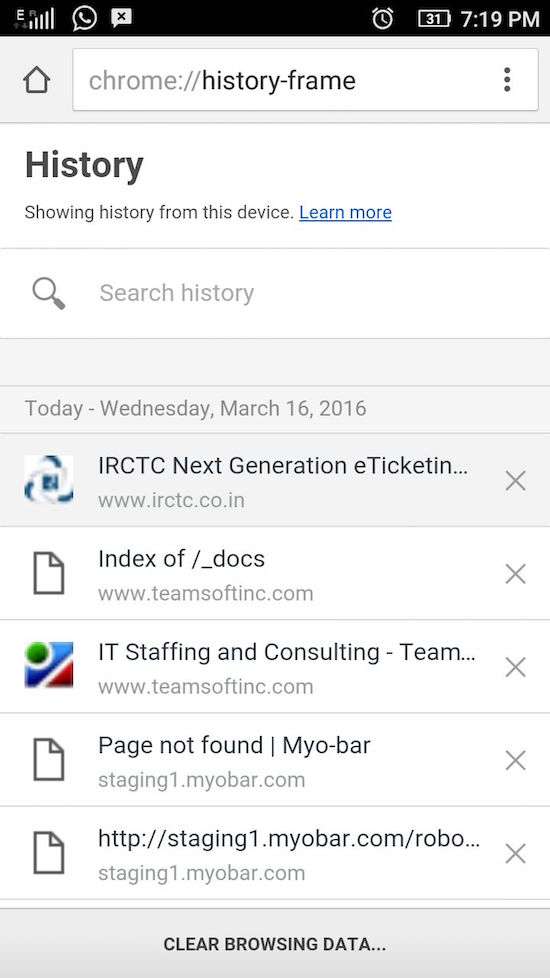
How to Do a Force Refresh on Android Devices
- Open Chrome
- Click "Settings" from the browser menu bar
- Find "Privacy" from the menu.
- Scroll down to the bottom and click "CLEAR BROWSING DATA"
- Once you have cleared the browser history you can load the website to see the latest update.

Why Do I Need to do This?
This happens because we may have changed some of the files that you have cached on your computer. This includes CSS files and other important files that your web browser might skip loading in order to save load time. Again, you've been visiting your website a lot, so your computer probably has saved these files. People that are coming to your website for the first time or people who haven't been there for a little while will be grabbing the latest files and they should be seeing things correctly.
If after doing this, you still see issues, then please contact us and even do a screen shot showing us what the issue is.
Do We Need to Instruct Our Website Visitors to do This?
No, you shouldn't have to. This is happening because you're visiting your website a lot - more than most people. Someone who hasn't ever been to your website will not have this problem. Someone who has not been to your website in the last few days will also not have this problem.
Converting Images / Designs from a Web Format to a Print Format
If you need your images that we’ve designed for your website converted to a print format, it will take us a little time to complete that for you but we can do it (Maintenance Block or hourly rate charges do apply for this work). This article explains the steps and process involved.
Web images are 72 pixels per inch (PPI) because that is the fixed resolution for computer monitor displays / the best that a computer monitor can display. Web images are set up in the RGB image format which is presented as various tones of red, green, and blue light. CMYK (cyan, magenta, ywllo and black) printing uses physical inks placed on paper. A common misconception is that any image on the Web can be used for printing. This can lead to undesirable results. An image for print normally uses 300 pixels per inch (PPI) or higher. When any image/design made for the Web has to be printed with acceptable quality, it has to be scaled up from 72 PPI to 300 PPI. Any vector information within the design like the text, does not affect quality. But any other image will need to be recreated and photographs will need to be imported again into the design at its full resolution.
The steps that are followed for Web to print conversion are:
- The image/design needs to be converted and saved as a separate file in CMYK mode.
- The pixel per inch (PPI) value is changed from 72 to 300.
Note: Though the document size does not differ, the pixel dimensions increase up to 4 times the original size.
- Photographs within the design are imported again at full resolution.
- Any other clean up of design elements are done so that there are no distortions or jagged edges.
- The design is exported to any of these formats: PDF/TIF/EPS or a working file (PSD), based on the printer's preference.
Note: A design made for the Web does not exceed 500Kb at high quality as a JPEG. But the same design exported to a print format can take up 10MB or more.
I Do Not Wish to Have Webstix Host My Website. What Do I Need to Provide?
Most of the websites we create use PHP and a database called MySQL. Your hosting needs to have these things available and we'll need the login account information for all of these things. This article will explain all that's needed and you can forward this on to your current web host and they should know exactly what we're looking for.
Server Requirements - Joomla:
*Do not use PHP 4.3.9, 4.4.2 or 5.0.4. These releases have known bugs that will interfere with installation. Zend Optimizer 2.5.10 for PHP 4.4.x also has serious bugs and you should ask your host to upgrade to a newer version. Joomla! versions 1.5.15 + are compatible with PHP 5.3. Note that the OpenID library is not yet compatible with PHP 5.3.
**Joomla is not yet compatible with MySQL 6.x.
***In order to use SEO URLs, you will need to have the Apache mod_rewrite extension installed.
****Joomla is optimized for Apache, but also runs on Microsoft IIS (though not officially supported). Depending on your setup, you may need the following:
For further assistance using Microsoft IIS, visit the Joomla IIS forum.
We highly suggest using a Linux server.
Server Requirements - WordPress:
- PHP version 5.2.4 or greater
- MySQL version 5.0 or greater
What to Provide to Webstix:
- FTP/SFTP:
- Server name / IP address
- Username
- Password
- MySQL:
- Server name / IP address
- Database name
- Username
- Password
What Also Helps Us / Optional:
- SSH login
- Location of a PHPMyAdmin installation (URL, username and password - if any)
- Your server control panel URL, username and password
Why Use Webstix Hosting?
Here are some things to think about if you are on the fence about whether to use Webstix website hosting or go with your own provider. You may get hosting with your ISP or phone provider but even though it may seem free, it could end up costing you more in the long run.
- Patches and upgrades - You are completely responsible for applying patches and upgrades to Joomla/WordPress. We may not remind you if they are needed. With our web hosting, we're on top of these updates and will let you know when your website needs them in order to be more secure.
- Webstix hosting is a one-stop-shop - When we host the site, you will never hear the words “you’ll have to contact your host about that…” or “We’re not sure but it looks like your host upgraded the XXX software…" When we host, we can troubleshoot things quickly without any barriers - it's our servers. Problems are fixed more quickly, which means more up time and less time (less cost to you).
- We have 100% access to all of our servers. We have what is called "root" access to every server we own. We're able to adjust and do anything we want. With most other hosts, you (or we) will not get this access. Getting things changed is either impossible or it takes days or weeks.
- When we upgrade our servers, we're able to test all the websites that we host to help reduce any problems that might occur. Sometimes things like PHP come out with major upgrades. We've been able to do them smoothly. With other hosts, we've had to give emergency service to some clients whose websites broke when their hosts did these upgrades and did not test their websites beforehand. Avoid the extra headaches and costs.
Having us host your website is not required but it could really reduce risk, headaches, cost and make your website less of a distraction so that you can run your business.
What We Need to Set Up Authorize.net for You
If you are going to use Authorize.net as your payment gateway provider, then we will need a few things from you in order to get your website set up with taking payments online. This article will explain that.
First of all, if you do not have a payment gateway provider and want to use Authorize.net, then here's how to get an account. You can typically get an account with Authorize.net from your bank or your merchant account (Visa / Mastercard) provider. If they don't offer it, then you can get it from an Authorize.net reseller or now, directly from Authorize.net.
Sign up for Authorize.net Here
Remember that any account set up with Authorize.net is in your company's name. Webstix does not do this for you. You need it in your name so that the funds go to your account and so that you pay their fees.
Once you get your Authorize.net account, you should login and go through the brief questions that they ask there in order to fully set up your account.
Here is the list of what we will need from you:
- Authorize.net Username
- Authorize.net Password
- API Login ID
- Transaction Key
Here is an article that will guide you to set up the API Login ID and Transaction Key:
https://support.authorize.net/s/article/How-do-I-obtain-my-API-Login-ID-and-Transaction-Key
Once things have been set up, you can later change your password if you wish.
We need this so that we can configure the online payment setup on your website and change it from test mode to live mode.
Please let us know if you have any questions.


